Development/iOS 개발
[iOS][SwiftUI] VStack, HStack, ZStack 정리
Tunko
2021. 2. 15. 12:12
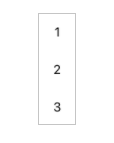
VStack
struct ContentView: View {
    var body: some View {
        VStack {
            Text("1").frame(width: 50, height: 50, alignment: .center)
            Text("2").frame(width: 50, height: 50, alignment: .center)
            Text("3").frame(width: 50, height: 50, alignment: .center)
        }
    }
}
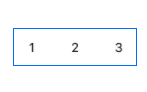
HStack
struct ContentView: View {
    var body: some View {
        HStack {
            Text("1").frame(width: 50, height: 50, alignment: .center)
            Text("2").frame(width: 50, height: 50, alignment: .center)
            Text("3").frame(width: 50, height: 50, alignment: .center)
        }
    }
}
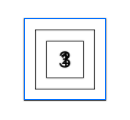
VStack (3개의 예시로 작성했습니다.)
예1)
struct ContentView: View {
    var body: some View {
        ZStack {
            Text("1").font(.title).frame(width: 50, height: 50, alignment: .center).border(Color.black, width: 1)
            Text("2").font(.headline).frame(width: 80, height: 80, alignment: .center).border(Color.black, width: 1)
            Text("3").font(.largeTitle).frame(width: 110, height: 110, alignment: .center).border(Color.black, width: 1)
        }
    }
} 
예2)
VStack 의 경우 겹치기 때문에 font와 border를 설정해보았다.
화면에 가장 앞쪽에 있는건 “3”이라 적힌 Text뷰이다.
다르게 예시를 들어보겠습니다.
struct ContentView: View {
    var body: some View {
        ZStack {
            Text("1").font(.title).frame(width: 50, height: 50, alignment: .center).border(Color.black, width: 1).background(Color.yellow)
            Text("2").font(.headline).frame(width: 80, height: 80, alignment: .center).border(Color.black, width: 1).background(Color.blue)
            Text("3").font(.largeTitle).frame(width: 110, height: 110, alignment: .center).border(Color.black, width: 1).background(Color.red)
        }
    }
}
예3) - 배치 변경
struct ContentView: View {
    var body: some View {
        ZStack {
            Text("3").font(.largeTitle).frame(width: 110, height: 110, alignment: .center).border(Color.black, width: 1).background(Color.red)
            Text("2").font(.headline).frame(width: 80, height: 80, alignment: .center).border(Color.black, width: 1).background(Color.blue)
            Text("1").font(.title).frame(width: 50, height: 50, alignment: .center).border(Color.black, width: 1).background(Color.yellow)
        }
    }
}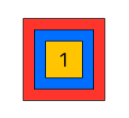
결론적으로 스택에 추가된 순서가 중요합니다.
반응형